Chapter1 Introduction
- Components
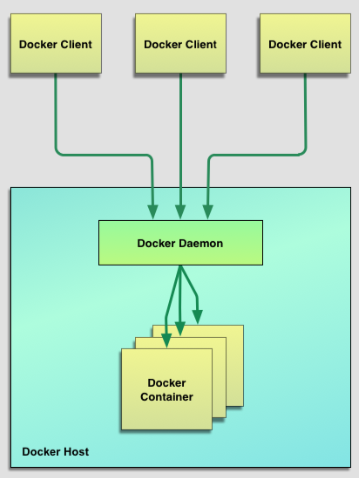
- Client&Server
- Client talk to Server(Daemon) by API
- Docker Images
- “source code” of Container
- Registries
- Store the images
- Docker Container
- Running/Executing aspect in Docker life cycle
- Client&Server
- Application
- Make local development and build workflow faster
- Running stand-alone services and applications consistently across multiple environments
- Create isolated instances to run tests by Jenkins CI
- Building and testing complex applications and architectures on a local host
Chapter2 Installation
Chapter3 Getting Start
Commands
| Command | Option | Description |
|---|---|---|
| docker info | ||
| docker run | ||
| -i | STDIN open | |
| -t | provides an interactive shell | |
| -d | detach the container to background | |
| -c | run with command | |
| -p | network ports Docker publishes at runtime | |
| -P | allows us to publish all ports we’ve exposed via EXPOSE instructions in our Dockerfile | |
| –name | create container with name | |
| –log-driver | control the logging driver used by your daemon and container | |
| –restart | always on-failure:5 |
|
| docker ps | display running container | |
| -a | all container | |
| -l | last container | |
| -q | only list IDs | |
| docker rm | remove container | |
| docker rm -f `sudo docker ps -a -q` | remove all container | |
| docker start | start container | |
| docker attach | reattach to the interactive session must start it first |
|
| docker logs | access container’s logs | |
| -f | monitor logs; similar as tail -f | |
| -t | output with timestamp | |
| docker top | inspect container’s processes | |
| docker exec | running a process inside an running container | |
| -d | indicate running background process | |
| docker stats | stats info about CPU, memory and network and storage I/O performance and metrics. | |
| docker inspect | print more info | |
| -format= | template of Go | |
| docker stop | ||
| docker port ContainerId | get mapped port |
Chapter4 Images&Repositories
4.1 What is a Docker image?
4.2-4.4 Commands
| Command | example | Description |
|---|---|---|
| docker images | ||
| docker pull | ||
| docker pull ubuntu:latest | ||
| docker pull ubuntu:16.04 | ||
| docker pull jamtur01/puppet:16.04 | username/reponame:tag | |
| docker search | ||
| docker login | ||
| docker logout | ||
| docker commit | Create image SHOULD USE Dockerfile instead |
|
| sudo docker commit -m “A new custom image” -a “James Turnbull” 4aab3ce3cb76 jamtur01/apache2:webserver | -m: commit message -a: author |
|
| docker history imageId | logs about how images created |
4.5 Dockerfile
- Two ways to build images
docker commit- Dockerfile
- Dockerfile Workflow
- runs a container from the image
- runs an instruction and makes a change to the container
- runs the equivalent of
docker committo commit a new layer - runs a new container from this new image
- repeat 2-4
How to build images
docker build -t="jamtur01/static_web:v1" .- -t: tag
- .: Dockerfile path
- local
- Git repo
- build cache
- treat previous layers as a cache
--no-cache- templating
ENV REFRESHED_AT 2019-01-01- update the ENV to ensure instructions below it run
Instructions
FROM- specifies an existing base image
MAINTAINERMAINTAINER James Turnbull "james@example.com"
RUN- running the command when the container is being built
RUN apt-get install -y nginxRUN [ "apt-get", " install", "-y", "nginx" ]
EXPOSE- the application in this container will use this specific port on the container
CMD- specifies the command to run when a container is
launched - You can only specify one CMD instruction in a Dockerfile
docker run image commandwould override CMD in Dockerfile- These 2 are same
sudo docker run -i -t jamtur01/static_web /bin/trueCMD ["/bin/true"]
- specifies the command to run when a container is
ENTRYPOINTENTRYPOINT ["/usr/sbin/nginx"]ENTRYPOINT ["/usr/sbin/nginx", "-g", "daemon off;"]means
/usr/sbin/nginx -g "daemon off;"1
2
3
4
5# in Dockerfile
ENTRYPOINT ["/usr/sbin/nginx"]
# command line launch
sudo docker run -t -i jamtur01/static_web -g "daemon off;"if we launch the container with right parameter, like
-g "daemon off;", it would override the-h. Or it would display the help message byCMD ["-h"]1
2ENTRYPOINT ["/usr/sbin/nginx"]
CMD ["-h"]we can override it by
docker run --entrypoint
WORKDIRSet working directory for
RUN,ENTRYPOINT,CMD1
2
3
4WORKDIR /opt/webapp/db
RUN bundle install
WORKDIR /opt/webapp
ENTRYPOINT [ "rackup" ]we can override it by
docker run -w
ENV- environment variables during the image build process
This new environment variable will be used for any subsequent RUN instructions
1
2
3
4
5
6
7
8
9
10
11
12
13
14ENV RVM_PATH /home/rvm/
RUN gem install unicorn
# the same as
RVM_PATH=/home/rvm/ gem install unicorn
# specify multiple envs
ENV RVM_PATH=/home/rvm RVM_ARCHFLAGS="-arch i386"
# can be used in other instructions
WORKDIR $RVM_PATH
# These environment variables will also be persisted into any containers created from your image
echo $RVM_PATHpass environment variables on runtime
docker run -e "WEB_PORT=8080"
USERspecifies a user that the image should be run as
1
2
3
4
5
6USER user
USER user:group
USER uid
USER uid:gid
USER user:gid
USER uid:groupdefault user is root
- can be override by
docker run -u
VOLUMN- adds volumes to any container created from the image
- see Chapter5&Chapter6
ADD- adds files and directories from our build environment into our image
- e.g. When installing an application
- cannot ADD files from outside the build directory or context
ADD software.lic /opt/application/software.lic- source file can be
- URL
- filename
- directory (should end with
/
- Docker will automatically unpack tar archive (valid archive types include gzip, bzip2, xz)
ADD latest.tar.gz /var/www/wordpress/
- If the destination doesn’t exist, Docker will create the full path
- with mode 0755, UID 0, GID 0
- adds files and directories from our build environment into our image
COPY- Similar as
ADD - But doesn’t extract, decompress
- Similar as
LABEL- Adds metadata to a Docker image
LABEL version="1.0" location="NY"- can be found in
docker inspect
STOPSIGNAL- sets the system call signal that will be sent to the container when you tell it to stop
ARG- defines variables that can be passed at build-time via the
docker buildcommandARG webapp_user=user
- can be overrided by
docker build --build-arg webapp_user=bbb. But has to be predefined in Dockerfile - Docker predefined ARG variables(we don’t need to define in Dockerfile but pass them by
--build-arg- HTTP_PROXY, http_proxy
- HTTPS_PROXY, https_proxy
- FTP_PROXY, ftp_proxy
- NO_PROXY, no_proxy
- defines variables that can be passed at build-time via the
SHELL- allows the default shell used for the shell form of commands to be overridden
- default shell on Linux
["/bin/sh", "-c"] - default shell on Windows
["cmd", "/S", "/C"]
- default shell on Linux
- allows the default shell used for the shell form of commands to be overridden
HEALTHCHECK- how to test a container to check that it is still working correctly
HEALTHCHECK --interval=10s --timeout=1m --retries=5 CMD curl http ://localhost || exit 1- We can also check health by
docker inspectdocker inspect --format '{\{.State.Health.Status}}' static_web
- There can be only 1 health check
- Can also disable it
HEALTHCHECK NONE
ONBUILD- adds triggers to images.
- A trigger is executed when the image is used as the basis of another image
it was specified right after the `FROM instruction
1
2
3
4
5
6
7
8
9
10
11
12
13
14
15
16
17
18
19# basic image Dockerfile
FROM ubuntu:16.04
...
ONBUILD ADD . /var/www/
# then we build it
sudo docker build -t="jamtur01/apache2" .
# next layer image Dockerfile
FROM jamtur01/apache2
...
# then we build it
sudo docker build -t="jamtur01/webapp" .
...
Step 0 : FROM jamtur01/apache2
# Executing 1 build triggers
Step onbuild-0 : ADD . /var/www/ # Triggered here
4.6 Pushing images to the Docker Hub
Pushing images
1
2
3
4
5# failed: because Root repositories are managed only by the Docker
sudo docker push static_web
# success
sudo docker push jamtur01/static_webAutomated Builds
- connecting a GitHub or BitBucket repository containing a Dockerfile to the Docker Hub
- When we push to this repository, an image build will be triggered and a new image created
4.7 Deleting an image
- Local
sudo docker rmi jamtur01/static_web
- Repo
- go to web page
4.8 Running your own Docker registry
Steps
1
2
3
4
5
6
7
8
9
10
11
12
13# 1. launch a container running version 2.0 of the registry application and bind port 5000 to the local host
docker run -d -p 5000:5000 --name registry registry:2
# 2. get image ID
sudo docker images jamtur01/static_web
# 3. Tagging our image for our new registry
sudo docker tag 22d47c8cb6e5 docker.example.com:5000/jamtur01/ static_web
# 4. sudo docker push docker.example.com:5000/jamtur01/static_web
# 5. launch container from local registry
sudo docker run -t -i docker.example.com:5000/jamtur01/ static_web /bin/bash
4.9 Alternative Indexes
- Quay
- provides a private hosted registry that allows you to upload both public and private containers.
Chapter5 Testing with Docker
5.1 Using Docker to test a static website
- Workflow
- create Dockerfile to
- install Nginx
- add Nginx configuration files
- Expose port
- build image
- build container from the image
sudo docker run -d -p 80 --name website \ -v $PWD/website:/var/www/html/website:ro \ jamtur01/nginx nginx
- create Dockerfile to
-v- create a volume in our container from a directory on the host
- provide persistent or shared data for Docker. This means that changes to a volume are made directly and bypass the image
- Use case
- We want to work on and test it simultaneously.
- It changes frequently, and we don’t want to rebuild the image during our development process.
- We want to share the code between multiple containers.
ro,rw- read-write status
5.2 Using Docker to build and test a web application
- Naive webapp
- create image
- install sinatra redis
- expose port
- run
/opt/webapp/bin/webapp
- build image
- download webapp
- launch container with
-v $PWD/webapp:/opt/webapp/
- create image
Webapp with Redis
- Prepare Redis server
- create image for redis server
- install redis-server
- expose port
- ENTRYPOINT to run redis-server
- Test if it works
- launch redis server container
- install redis-cli locally to test with localhost:exposedPort
- create image for redis server
- Prepare Docker Networking
- create a bridge network called
app - launch a Redis container called
dbinside the network - Test if it works
- launch another container inside of the network
- install
dnsutils,iputils-ping nslookup db,ping db.app- any host in the
appnetwork can be resolved byhostname.app
- any host in the
- create a bridge network called
- Prepare Sinatra application
- download new webapp_redis
- create connection to Redis database on a host called db on port 6379
- with GET, POST API
- launch Sinatra application inside
appnetwork with-v $PWD/webapp_redis
- download new webapp_redis
- Test
- POST to Sinatra application, which store parameters in Redis
- GET to Sinatra application, which fetch parameters in Redis
- Prepare Redis server
Docker Networking
- Docker Networking can connect containers to each other across different hosts.
- Containers connected via Docker Networking can be stopped, started or restarted without needing to update connections.
- With Docker Networking you don’t need to create a container before you can connect to it. You also don’t need to worry about the order in which you run containers and you get internal container name resolution and discovery inside the network.
Commands
| Command | Description |
|---|---|
docker network ls |
|
docker network create |
|
docker network inspect |
|
docker network rm |
|
docker network connect $NETWORK $CONTAINER |
add already running container to existing networks |
docker network disconnect $NETWORK $CONTAINER |
5.3 Using Docker for continuous integration
- Create&Build Jenkins&Docker image
- Use jenkins image
- install docker
- install plugins
- Create Jenkin’s configuration folder
- locally create a jenkins folder(
jenkins_home)
- locally create a jenkins folder(
- Run container(up Jenkins server)
- mount
jenkins_home: perpetuate Jenkin’s configuration - mount
docker.sock: run Docker containers from inside our Jenkins container
- mount
- Create Jenkins job
- set workspace as
jenkins_home/xxx - set Source Code as a git repo
- Add Build Step
- build image which is in
workspace - run container
- mount
workspaceinto Build Docker - Build&RunTests
- attach container to see output
docker wait- rm container
- mount
- build image which is in
- Add post-build action
- to publish test report
- Enabling SCM polling
- triggers automatic build when new commits made to the repo
- set workspace as
5.4 Multi-configuration Jenkins
What if we wanted to test our application on Ubuntu, Debian and CentOS?
new jobasMulti-configuration projectAdd Axisas {OS: {centos,debian,ubuntu}}Build EnvironmentasDelete workspace before build starts- In code repo, create
centos,debian,ubuntufolders, create Dockfile in each of them - Add Build Step
cd $OSbefore doing anything
5.5 Other alternatives
i.e. other CI tools other than Jenkins
- Drone
- Shippable
Chapter 6 Building services with Docker
6.1 Building our first application
Volume is a specially designated directory within one or more containers that bypasses the Union File System to provide several useful features for persistent or shared data:
- Volumes can be shared and reused between containers.
- A container doesn’t have to be running to share its volumes.
- Changes to a volume are made directly.
- Changes to a volume will not be included when you update an image.
- Volumes persist even when no containers use them.
This allows you to add data (e.g., source code, a database, or other content) into an image without committing it to the image and allows you to share that data between containers. - Volumes live in Docker host
var/lib/docker/volumes
- Build Jekyll-Apache application
- Build Jekyll image
VOLUMN /data: hold source code(why??)VOLUMN /var/www/html: hold compiled Jekyll siteENTRYPOINTto compile Jekyll to/var/www/html
- Build Apache image
VOLUMN /var/www/html: compiled Jekyll site- run apache by default
- Pull Git code locally
- Creating Jekyll container with
-v codeInStep3:/data/ - Creating Apache container with
--volumns-from containerInStep4
- Build Jekyll image
- Update Jekyll website
- Locally, update title then
sudo docker start james_blog- local source code updated
- source code mounted into Jekyll
start Jekyllto recompile into/var/www/htmlJekyllexit automaticallyJekyllvolume intoApacheautomatically- then pages are updated
- Locally, update title then
- Back up Jekyll volume
sudo docker run --rm --volumes-from james_blog \ -v $(pwd):/backup ubuntu tar cvf /backup/james_blog_backup.tar /var/www/html--rm: automatically deletes the container after the process running in it is ended- It creates a new container to
volumes-fromblog - tar the blog
- mounted the tared blog to local
- Potential extention
- Web cluster: run multiple Apache container, all which use the same volume from the
james_blogcontainer - Generic and portable solution: make a new image to clone and mount code into
Jekyll. So that we don’t need to install git and any source code locally - Based on 2, we can build a web front end for our service that build and deployed sites automatically from a specific source
- Web cluster: run multiple Apache container, all which use the same volume from the
6.2 Building a Java application server
Fetching and running a Java application from a WAR file in a Tomcat server(Web application ARchive, we can run it directory after putting in tomcat webapp direcory)
- Build a WAR file fetcher
- VOLUME
/var/lib/tomcat7/webapps/ wgetinto the volumed dir without url- Creating fetcher container with url
- VOLUME
- Build tomcat server
- VOLUME
/var/lib/tomcat7/webapps/ - ENTRYPOINT to run tomcat
- Creating tomcat container by
--volumes-from fetcherContainer
- VOLUME
- An extention by author
- He made an app called
Tprov, which is a web application using for controlling step1 - so we can input web name, WAR url and click submit
- then we can see running state
- He made an app called
6.3 A multi-container application stack
A big combination
- A Node container: Node application
- A Redis primary container: hold and cluster our state
- 2 Redis replica container to cluster our state
- A logging container to capture our application logs
Node container
- download nodeapp to hold application code
- right stream to
/var/log/nodeapp/nodeapp.log - store session in redis
- a GET method
- right stream to
- Dockerfile
- install nodejs npm
- mkdir
/var/log/nodeappand VOLUME it ADD nodeapp /opt/nodeapp- ENTRYPOINT
nodejs server.js
- run Node container
-p 3000:3000 --net express
- download nodeapp to hold application code
- Redis container
- Redis base image
- VOLUME
var/lib/redis - VOLUME
var/log/redis
- VOLUME
- Primary Redis image
- only ENTRYPOINT that runs the default Redis server, which logs into
var/log/redis/redis-server.log
- only ENTRYPOINT that runs the default Redis server, which logs into
- Replica Redis image
- only ENTRYPOINT that runs a Redis replica server, which logs into
var/log/redis/redis-replica.log --slaveof redis_primary 6379: this is a replica of theredis_primaryhost and should attempt replication on port6379
- only ENTRYPOINT that runs a Redis replica server, which logs into
- Creating Redis back-end cluster
- create express network
- run
redis_primaryin--net express - run
redis_replica1 --net express - run
redis_replica2 --net express - We can read primary Redis logs by
sudo docker run -ti --rm --volumes-from redis_primary ubuntu cat /var/log/redis/redis-server.log
- Redis base image
- Capture application logs using
Logstash- Dockerfile
- install
logstash - add
logstash.confin container- monitor logs file
- output stdout
- run logstash
- install
- create log app container
- volumes-from redis_primary and nodeapp
- Dockerfile
6.4 Managing Docker containers without SSH
sudo docker exec -ti nodeapp /bin/bash
Chapter7 Docker Orchestration and Service Discovery
7.1 Docker Compose
- Define a set of containers to boot up and their runtime properties in a YAML file
this can make constructing applications from multiple Docker containers.
Example
docker-compose.yml1
2
3
4
5
6
7
8
9
10services:
web:
image: jamtur01/composeapp
command: python app.py
ports:
- "5000:5000"
volumes:
- .:/composeapp
redis:
image: redisrequirements.txt- for
pip installin Dockerfile
- for
app.py- application file
Dockerfilefordocker compose- copy everything into
/composeapp pip install requirements.txt
- copy everything into
- Commands
| Command |
|---|
docker-compose up |
docker-compose ps |
docker-compose logs |
docker-compose kill |
docker-compose stop |
docker-compose start |
docker-compose rm |
7.2 Distributed application
using Consul: seems could be replaced by Docker Swarm(no need for Service Discory
7.3 Docker Swarm
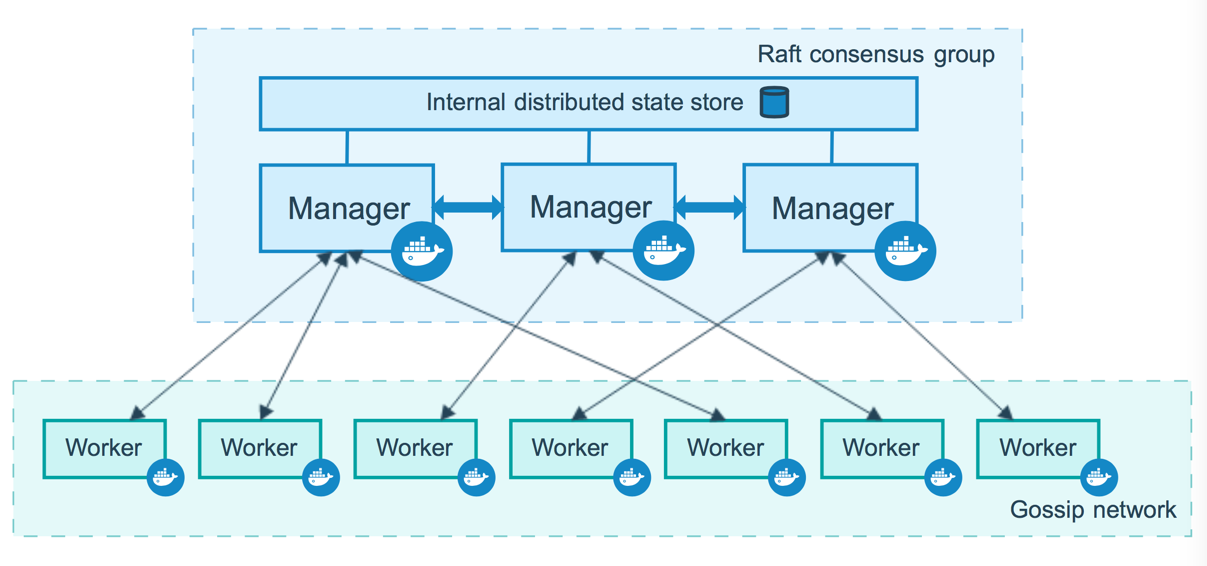
- Basic Concept
- A swarm is made up of manager and worker nodes.
- Manager do the dispatching and organizing of work on the swarm.
- We can have many managers, many workers, but only one leader
- Assume we are going to have
Manager,Worker1,Worker2 - Can be used as
Load balancing
- Commands
| command | description | |
|---|---|---|
| docker node ls | ||
| docker service create | --mode global: global services run on every worker in the swarm |
|
| docker service scale | how many tasks to work | |
| docker service rm | ||
| docker service ls |
- Setting up a Swarm
- In Manager
- get public ip
- `sudo docker swarm init –advertise-addr $PUBLIC_IP
- In worker nodes
sudo docker join ...
- Running a service on Swarm
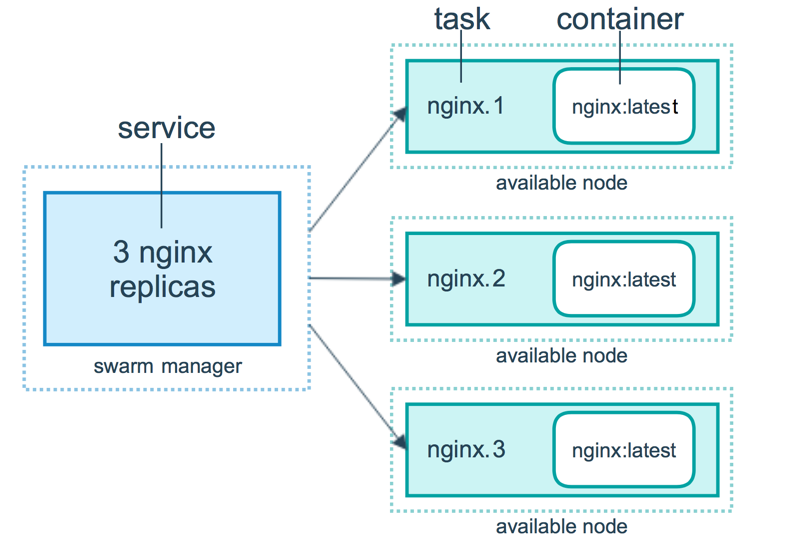
sudo docker service create --replicas 2 --name ... ubuntu /bin/sh -c "..."
- In Manager
7.4 Orchestration alternatives and components
| Tool Name | Description |
|---|---|
| Fleet | cluster management tool |
| etcd | key value store for shared configuration and service discovery |
| Kubernetes | cluster management tool open sourced by Google |
| Apache Mesos | cluster management tool |
| Helios | deploying and managing containers across an entire fleet |
| Genturion | takes containers from a Docker registry and runs them on a fleet of hosts with the correct environment variables, host volume mappings, and port mappings. It is designed to help you do continuous deployment with Docker. |
Chapter8 Using the Docker API
8.1 Docker APIs
- Registry API
- provides integration with the Docker registry
- Docker Hub API
- provides integration with the Docker Hub
- Docker Remote API
- provides integration with the Docker daemon
8.2 First steps with Remote API
- the Remote API is provided by the Docker daemon
- the Docker daemons binds to a socket,
unix:///var/run/docker.sock - we can edit the daemon’s startup configuration files to change the bind
- then
sudo systemctl --system daemon-reload - test with
sudo docker -H docker.example.com:port info- we can also
export DOCKER_HOST="xxx"to throw the-Haway
- we can also
8.3 Testing the Docker Remote API
| API | description |
|---|---|
curl http://docker.example.com:port/info |
docker info |
curl http://docker.example.com:port/images/json |
docker images |
curl http://docker.example.com:port/images/${id}/json |
`docker images ${id} |
curl http://docker.example.com:port/images/search?term=... |
|
curl http://docker.example.com:port/containers/json |
docker ps |
curl http://docker.example.com:port/containers/json?all=1 |
docker ps -a |
| … | some more POST to launch/create/run |
8.4 Improving the TProv application
by ruby-docker API, for example
8.5 Authenticating the Docker Remote API
- Create a certificate authority
- Create a server certificate signing request and key
Configure the docker daemon
1
ExecStart=/usr/bin/docker -d -H tcp://0.0.0.0:2376 --tlsverify -- tlscacert=/etc/docker/ca.pem --tlscert=/etc/docker/server-cert. pem --tlskey=/etc/docker/server-key.pem
Create a client certificate and key
Configure the docker client using the certificates and keys
1
2
3
4
5mkdir -p ~/.docker/
cp ca.pem ~/.docker/ca.pem
cp client-key.pem ~/.docker/key.pem
cp client-cert.pem ~/.docker/cert.pem
chmod 0600 ~/.docker/key.pem ~/.docker/cert.pemTesting
sudo docker -H=docker.example.com:2376 --tlsverify info